Custom Post Types, announced in WordPress 3.0, boosted the popularity to WordPress sites among clients and developers in 2010. WordPress is quite easy for newbies in web to use, and it’s very simple and self-explanatory for content editors. With Custom Post Types we can improve standard functionality in times and add more sections (like Posts or Pages).
Another cool feature which gives you an option to improve your WordPress base is WordPress Custom Fields. However, for a non-technical person, it can be hard to use. We tried to use different plugins, which improve the usability of standard custom fields (like Custom Fields); however, we found a lot of major bugs there – it used a lot of memory etc. (it was far 2011 🙂 ). The now well-known plugin Advanced Custom Fields also wasn’t that good in 2011 with an unfriendly user interface and a very small amount of features.
We decided to create our own Custom Fields plugin, which wouldn’t use a lot of memory yet still be easy to use and easy to expand.
In July 2011 we announced our new plugin named “Just Custom Fields for WordPress“. This plugin adds custom fields for standard and custom post types in WordPress. After installation, you will see a simple settings page which is self-explanatory to use.
What you will learn:
Installation:
- Download, unzip and upload to your WordPress plugins directory
- Activate the plugin within your WordPress Administration Backend
- Go to Settings > Just Custom Fields
- Choose Post Type (Standard/Custom) where you would like to edit custom fields
- Create Fieldset
- Add fields to the fieldset.
Screenshots:
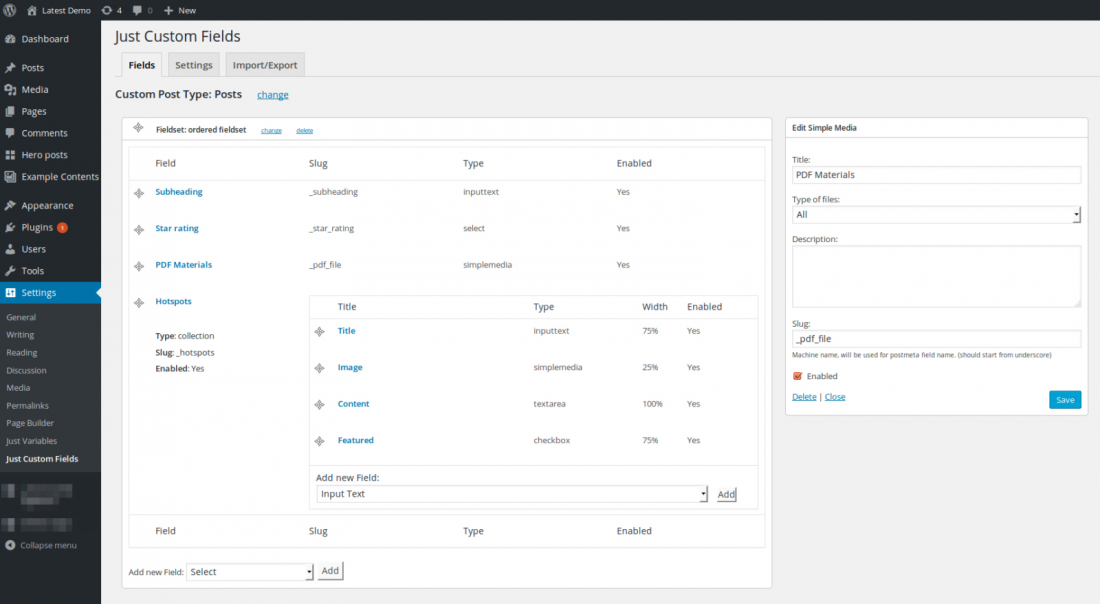
On this screenshot, you can see the settings page for a “Page post type. You can create fieldsets and fields inside of it. This page uses WordPress AJAX API, so it updates without any redirects and editing, rather quickly.
You can create a field with one of the types below:
- Input text: usual single-line text box
- Select: usual dropdown list
- Select Multiple: area which allows you to select multiple options from the list
- Checkbox: you can add one or multiple checkboxes
- Textarea: multi-line text field. You can also enable WordPress editor for this field
- Datepicker: input field with calendar popup to choose a date
- Simple media: use this field to create an image or file container
- Collection: with the help of this field, you can create multiple groups of fields, which can be repeated a number of times. You can add other field to this collection. For example, you can create your own Gallery, by adding Simple media for image, Input Text for Title, and Textarea for description.
- Related Content: using this field allows you to link other post types with your post
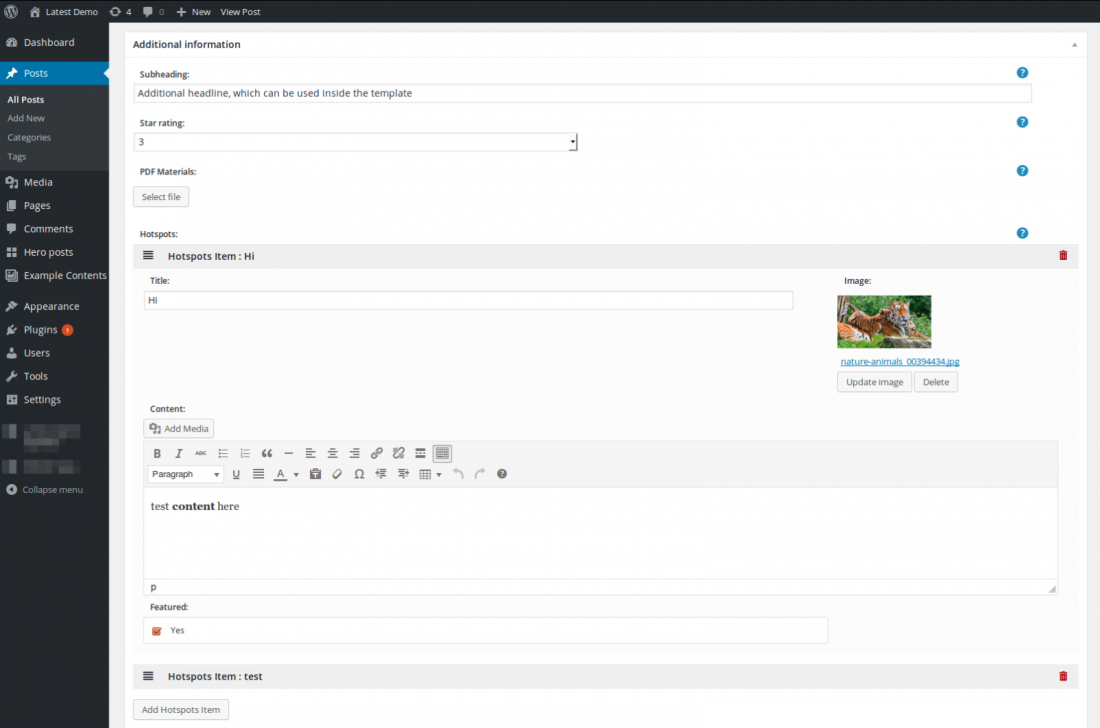
The following screenshot illustrates how a fieldset will look on a post edit page. There is the usual text box, select box, file upload and Collection with Simple media field (as you can see you can upload many images in this way).
WordPress developers also find this plugin very useful as it’s very easy to add their own components and custom fields with their own plugins and even themes, using some new hooks. For more details, you are welcome to check readme.txt file from the plugin package.
Templates usage
Using WordPress Shortcode functions
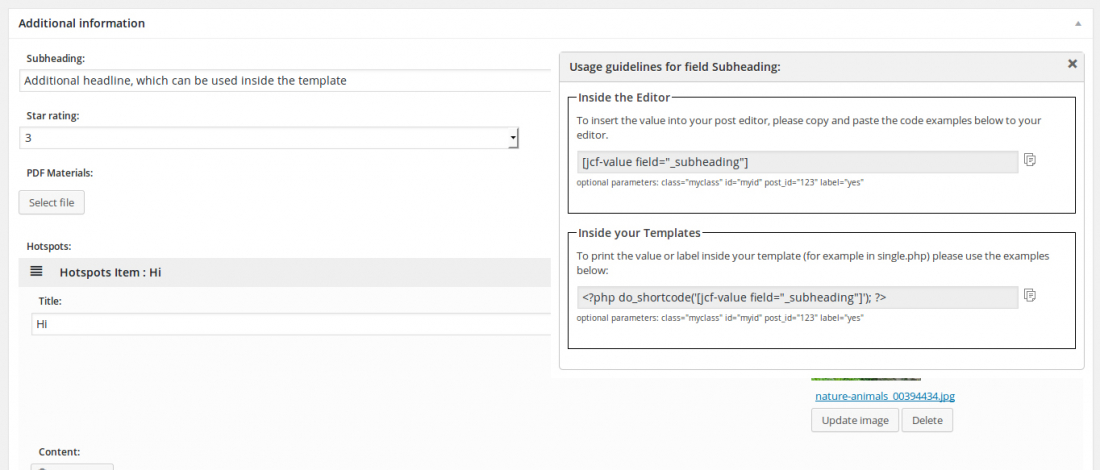
If you are not familiar with Post meta API we recommend using the plugin shortcodes, presented in version 2.2.
You can find usage instructions on the post edit page, under help popup. Just insert code example into your template, and it will print the value for you.
Shortcode adds a lot of HTML wrappers for frontend developers to be able to style/position value for any needs.
Working with Post Meta directly
For skilled WordPress developers, we recommend using native post meta functions such as:
Let’s show some examples. We created 3 custom fields for the Page with the following slugs:
- _price (Input Text)
- _features (Checkboxes/multiple)
- _author_avatar (Simple Media / image)
To get values in templates, you need to place the following lines of code inside the loop functions:
$price = get_post_meta(get_the_ID(), '_price', true); // we get value from input text
$avatar_id = get_post_meta(get_the_ID(), '_author_avatar', true); // we get image attachment ID
$features = get_post_meta(get_the_ID(), '_features', true); // we get array of checked checkboxes
Now, when you have variables with the data, you can print them in the template. For example like this:
Price: <?php echo $price; ?>
Features: <?php foreach($features as $feature) echo $feature.','; ?>
Avatar: <?php wp_get_attachment_image($avatar_id, ‘thumbnail’); ?>
You can read more about using custom fields on Codex.WordPress.org: Custom Fields or search for more information in Google. There are a lot of examples on different sites demonstrating how to use WordPress custom fields. Our plugin creates an easy interface to edit in the administration panel, and you can use all built-in WordPress functions for custom fields.
Download
Our plugin is available for downloading in official WordPress repository:
Just Custom Fields for WordPress at WordPress.org repository


